ODROID H4 Ultra NAS Hardware
Way back in 2015, I built a NAS. I’d had a “NAS” before, but it was old/spare parts cobbled together to approximate a NAS. This was the first NAS I built, where I bought parts specifically to make a NAS.
I remember doing some research, but ultimately just deciding to go with this wonderful guide from Brian C Moses. It was not the most powerful box, but it did what I needed and I got about 10 years out of it, so I’d say it was a success.
For it’s replacement, I had three goals in mind. First, a faster CPU. I don’t need a monster CPU, but I wanted it to feel like an upgrade from the previous box, so something like a Raspberry PI was out. Second, I wanted to go with SSDs. I don’t have a huge demand for performance, but I don’t like to wait on my computers, and an SSD is the easiest way to make any system more responsive. Beyond that, I just wanted it to be as quiet and low power as possible.
I’d heard some folks having success with options like a Beelink or a Minisforum mini PC, but I felt like it was tricky to find something that had sufficient SSD adapters and the physical space for multiple drives. I was also a bit skeptical at the longevity a device like this might get when running 24x7.
My next thought was to look at single-board PC options. I knew that a Raspberry PI was out, even the five just didn’t have the speed I wanted. I was also leaning towards x86_64, just for software compatibility, and with that what I ended up picking up was an ODROID H4 Ultra. The H4 Plus looked nice too, but when you’re on a 10 year refresh cycle like me, it’s best to get all the extra CPU you can afford up front.
CPU aside, what I liked about ODROID unit was the following:
- It’s small, silent, and low power (or rather has a good power/performance ratio for my needs).
- It can get 32G of RAM easily, which should be more than enough for my needs.
- It’s got four SATA ports on-board, plus an open NVMe slot, so I could run the OS from there (or swap that for some other PCIe device).
- It’s x86_64 so there’s no need for any ARM weirdness. Grab any Linux ISO and it’ll run.
To make things easier on myself, I also picked up the ODROID H4 Type-3 case. The type-3 case can fit up to four 2.5" drives in addition to a fan and the ODROID H4 itself, which is plenty for my needs. I also grabbed a couple 200mm power/ssd cables, a slim fan, and the bigger power supply. I don’t think I really needed the larger power supply, but wanted to have extra if I later decide to add more drives, an NVMe (or expansion card) or some USB devices. I got all that from the HardKernel site.
I then bought two 1TB SSDs, as my storage needs are pretty modest, 32G of RAM from Microcenter. To round out the system, I used a spare 2.5" HDD I had lying around for the OS drive.
That all came in around $500.
After everything arrived, I started the build.
The case is nice. It’s solid and compact. What it lacked entirely were directions for assembling it. There was nothing in the box, not even a link or QR code to instructions. I found an assembly video on the ODROID site.
The problem with the video is that it’s more of a high-speed overview of the case than step-by-step assembly instructions. It moves fast and doesn’t show all the details. After watching it many times and an lot of rewinding, I was able to get the unit assembled though. In hindsight, there was nothing too crazy. I’ve definitely worked with worse cases.
All-in-all, I’m happy with the purchase. It fits my needs well. Would I recommend it? Yes. If you are, like me, looking for a small, quiet, low-power NAS with decent performance then I think it’s a solid option. I am still loading software on it, and will post some more when I get all that set up.
If you’re considering a build for yourself, here are a few notes from the experience that might help.
-
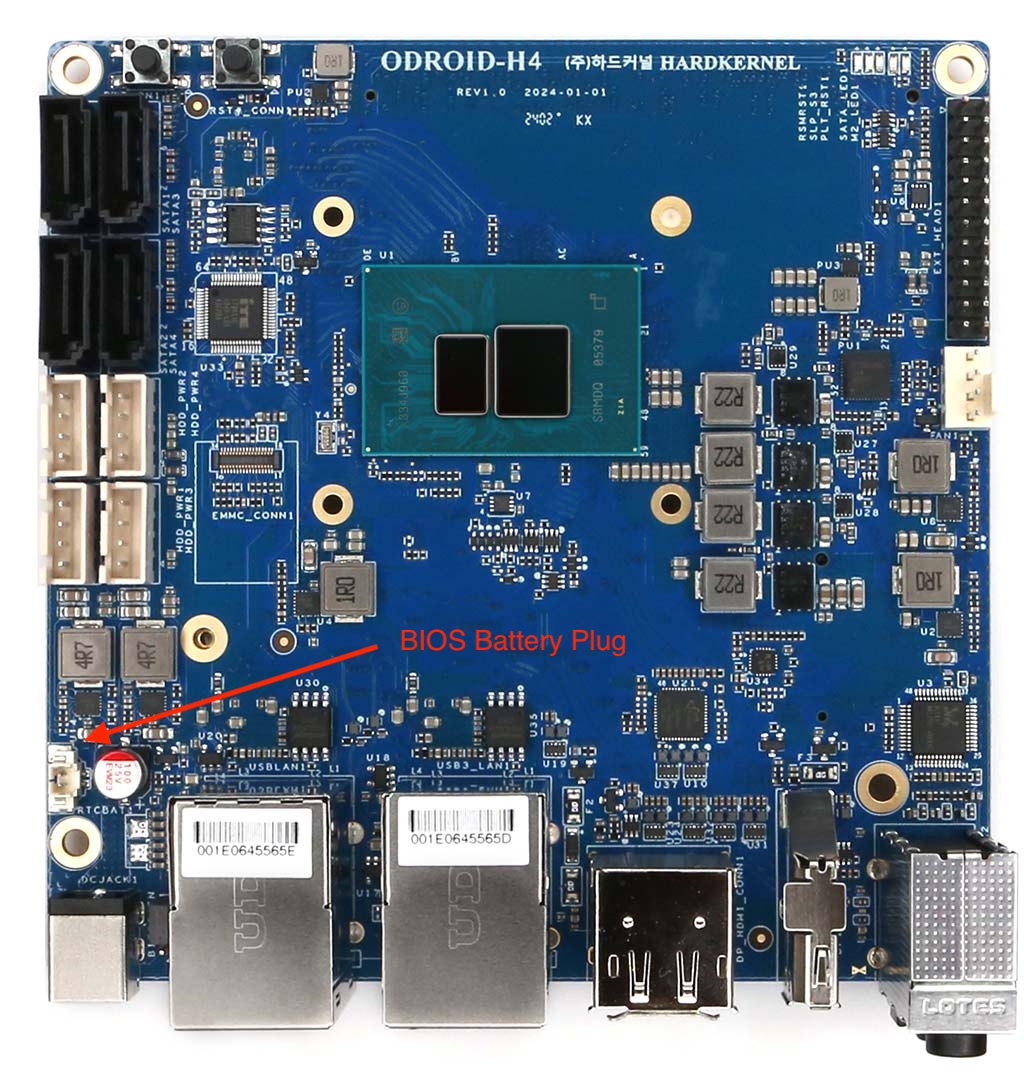
There was a red plastic back in the box. It had a little circular piece in it the size of a button with a small cord off it. I knew I needed it for something, but there was no label or anything. After a little searching, I discovered that it is the bios battery and super important if you want a reliable clock. It plugs into the main board, just on the left edge, see the image below.
-
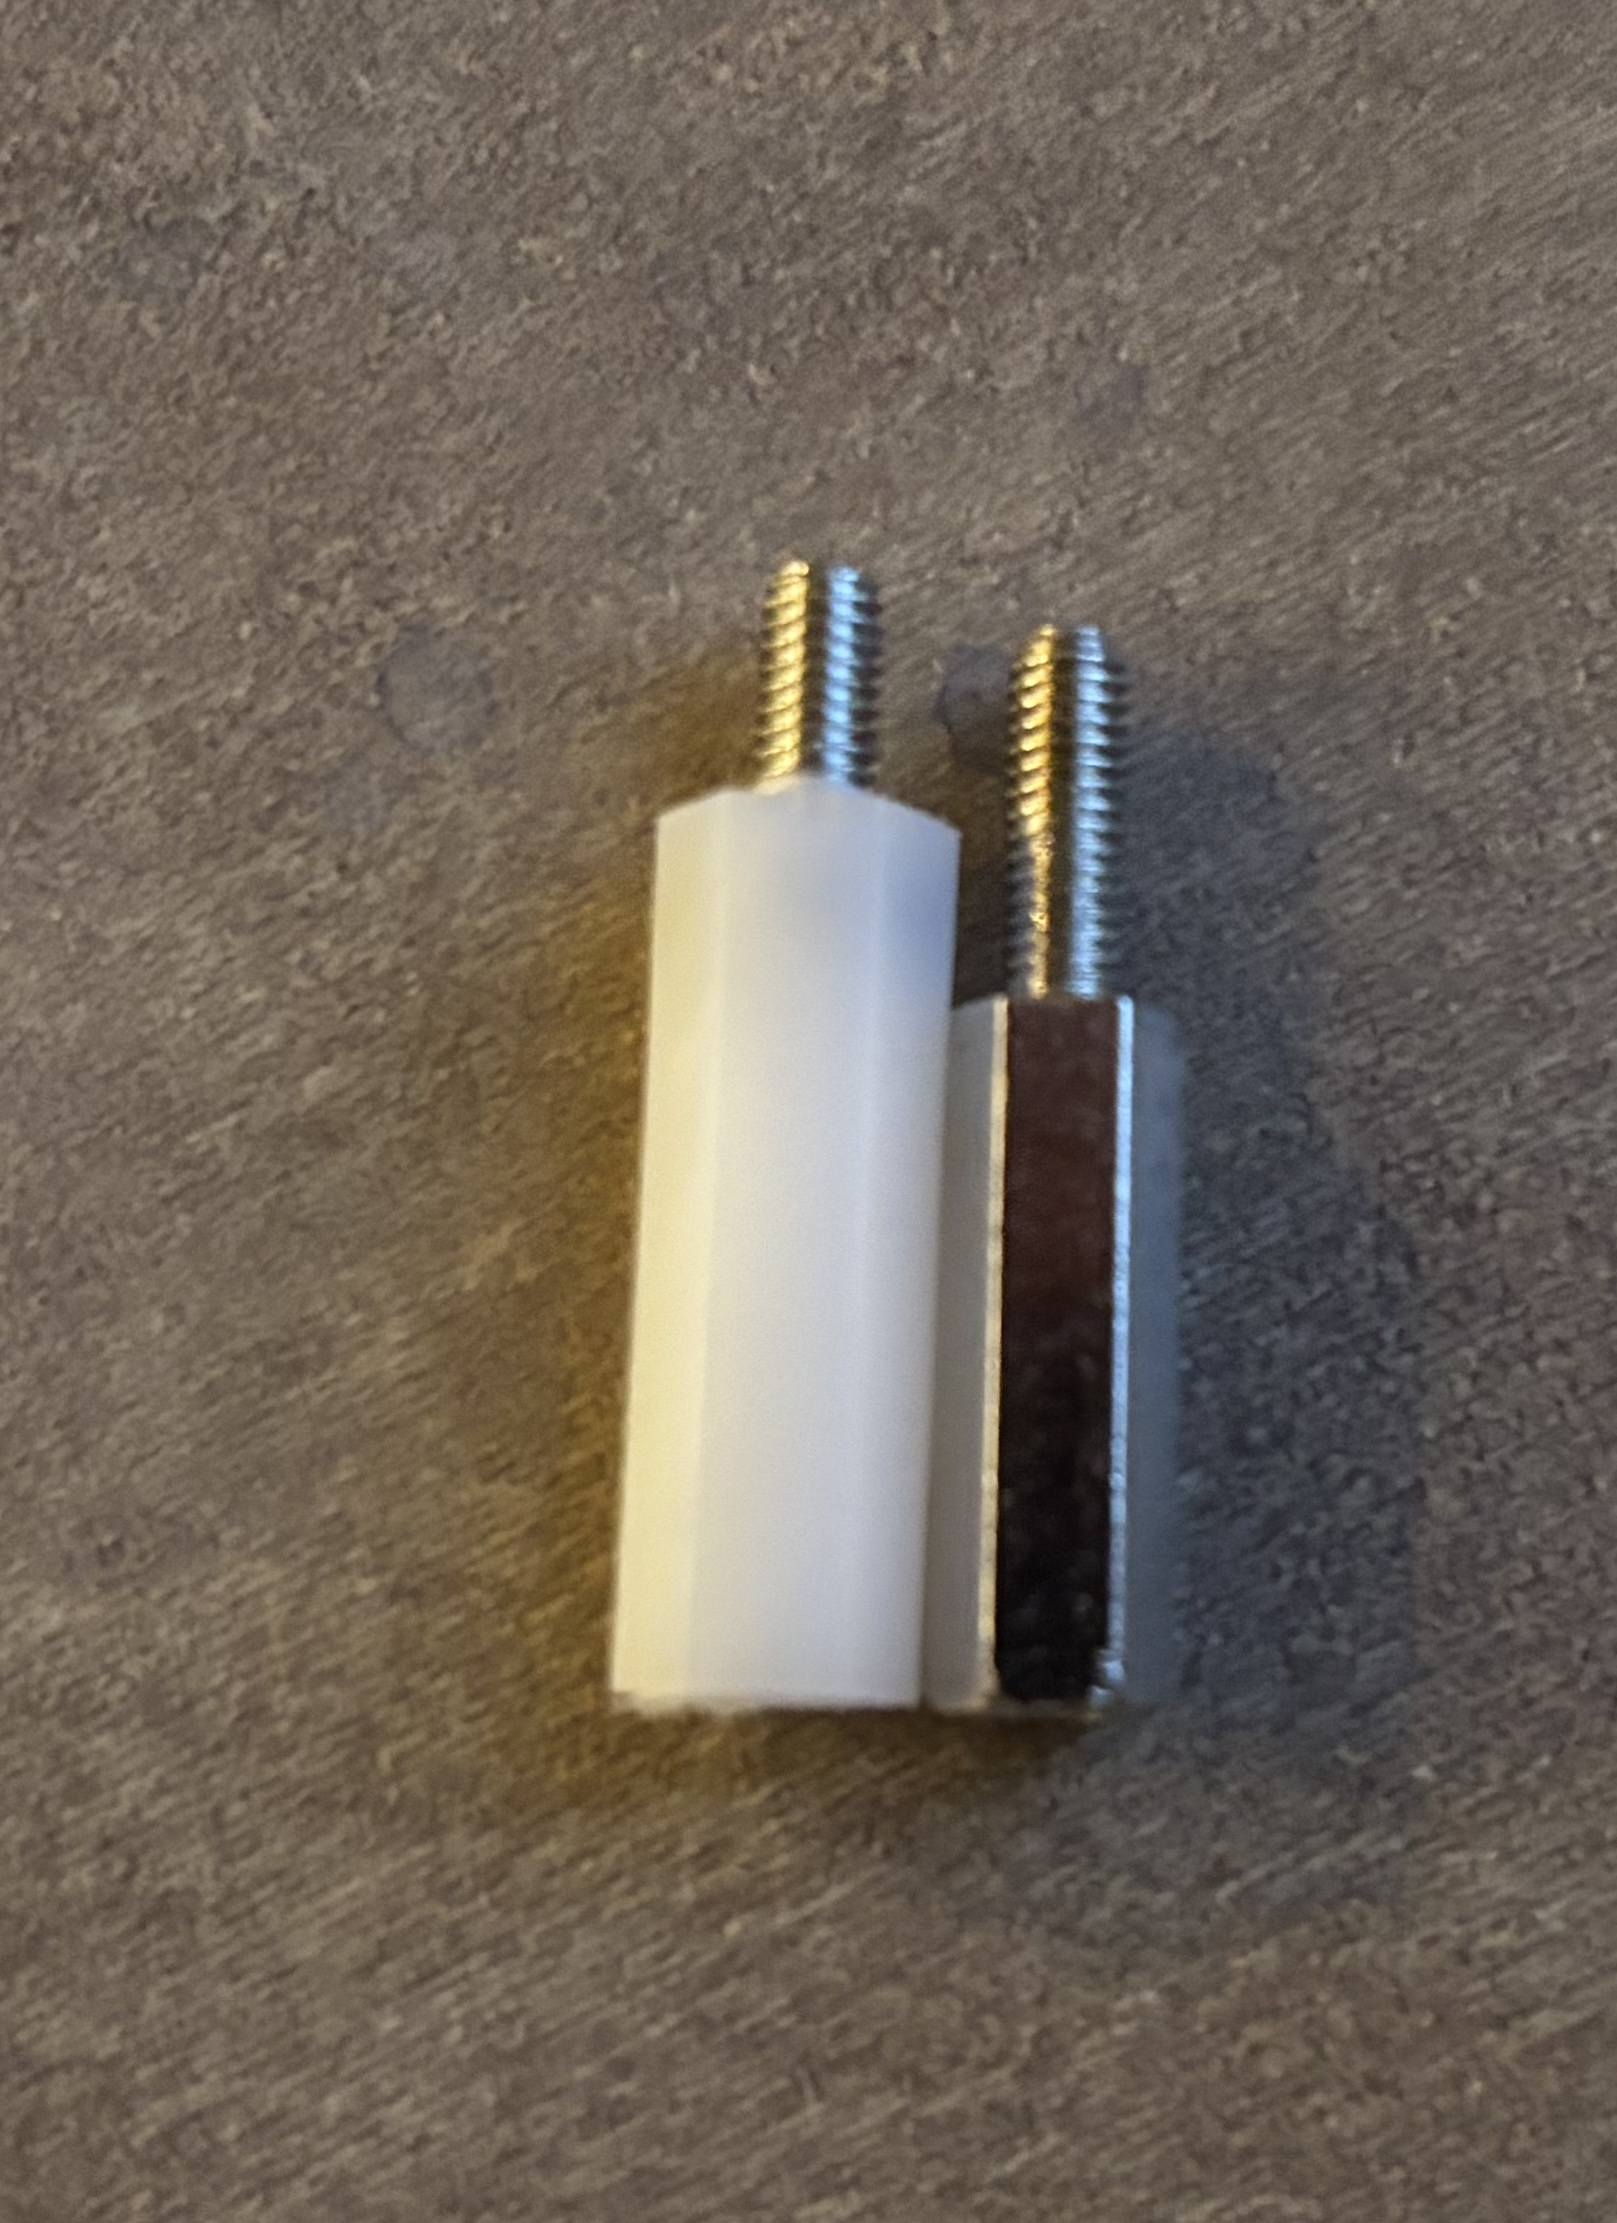
The video I found, assembled the case and used a board with the optional daughter/expansion card on it. This ended up being important, because you need to use different expansion posts when you’re assembling the case if you have the optional daughter/expansion card. That card adds about 1/4" to the height of the board, so you use two posts that are shorter on one side of the case to compensate.
If you use those same posts and do not have the daughter/expansion card, then you end up like I did with a case lid that doesn’t quite fit together properly.
Anyway, if you have the daughter/expansion card, you want the metal posts like in the video. If you don’t, you want the white plastic posts which are just slightly longer.
-
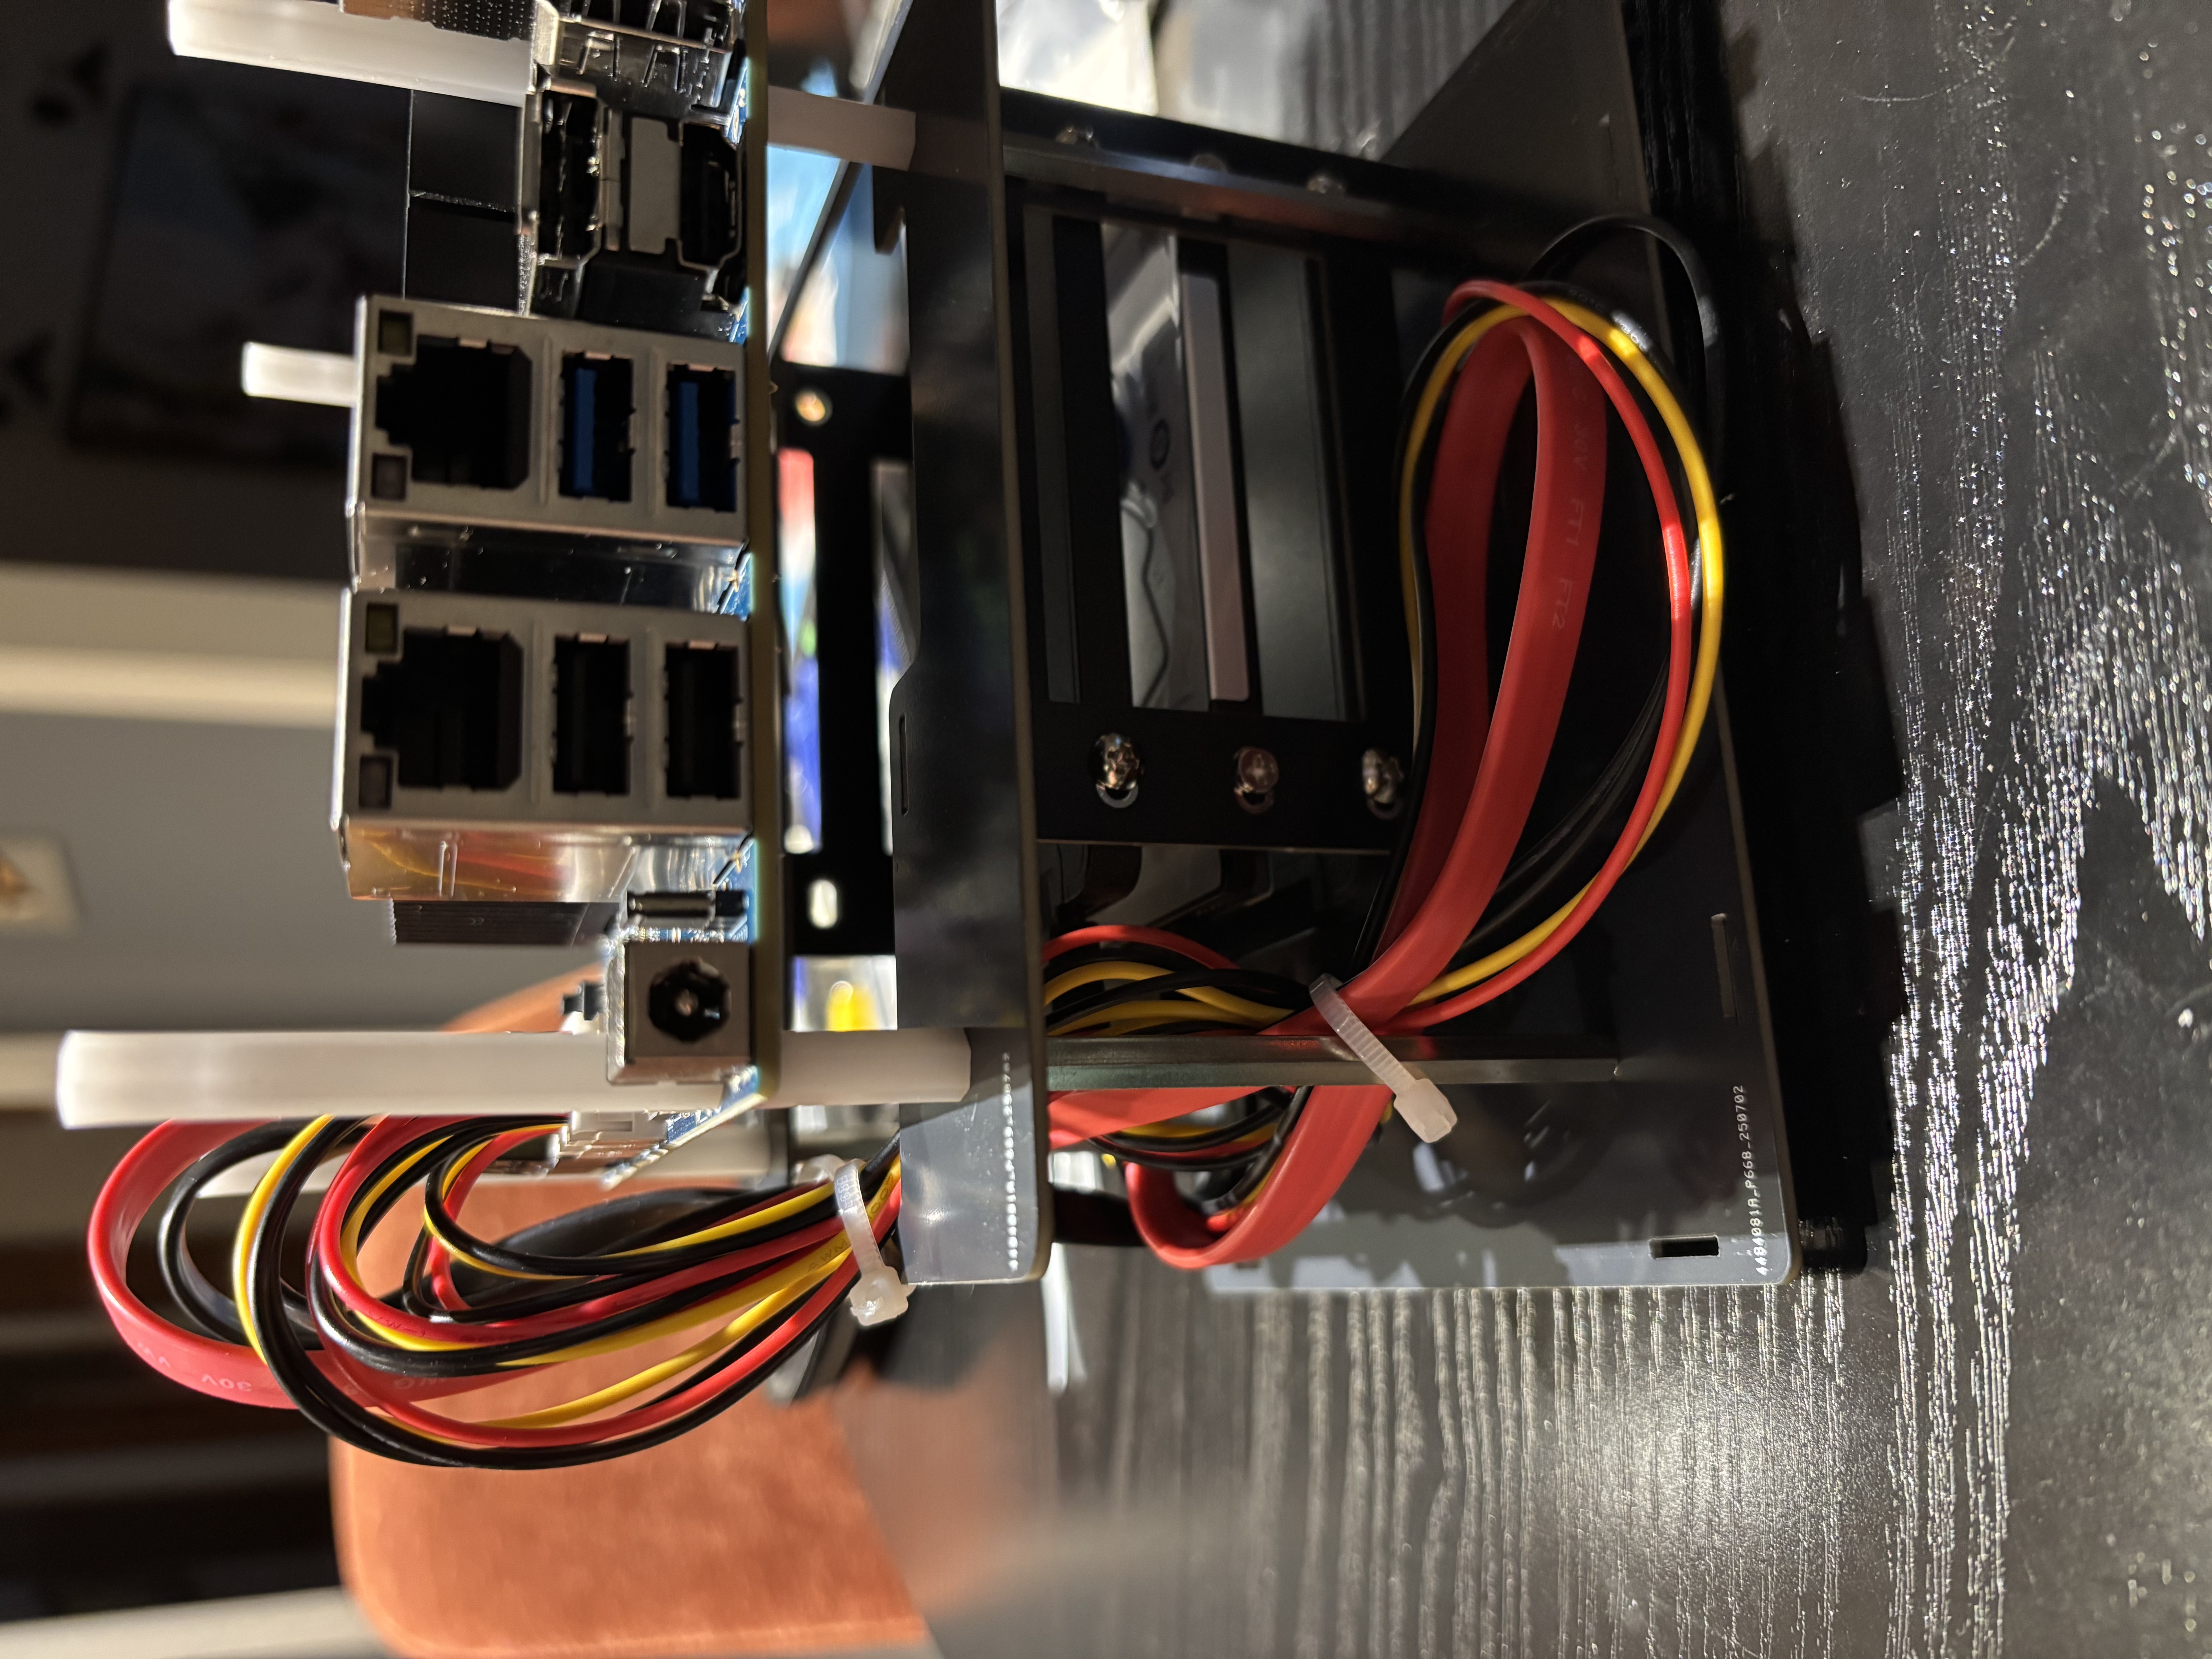
Getting the right size SSD power/data cables is important. The 200mm is plenty and any left over cable, you need to put somewhere. The case is small though, so there’s not a lot of extra space for the cables. If you buy ones that are larger, you may run short on space.
-
I highly recommend buying the SSD power/data cables with the ODROID unit. You can find those cables elsewhere, but it’s not easy, nor were they as cheap or the right length. If you’re getting space for four drives, just buy four sets of cables so you have them. Your future self will thank you. If you forget and the link still works, this is the set I ended up buying on Amazon link. They were more expensive and too long, but they are the correct connectors on both end.
This is a screenshot of the case mostly assembled with three drives and the cable from Amazon for the third drive. You can see things are getting a little full. That said, there is room for some zip ties in a few places, so you do have some cable management options.
-
This didn’t get me yet, but as I was adding the third drive I noticed it and I’m sure it’s going to tick me off in the future. When you have the drive enclosure screwed into the case and your drives screwed into the enclosure there is one screw on each drive that you cannot reach. That set of screws are blocked by one of the posts for the case.
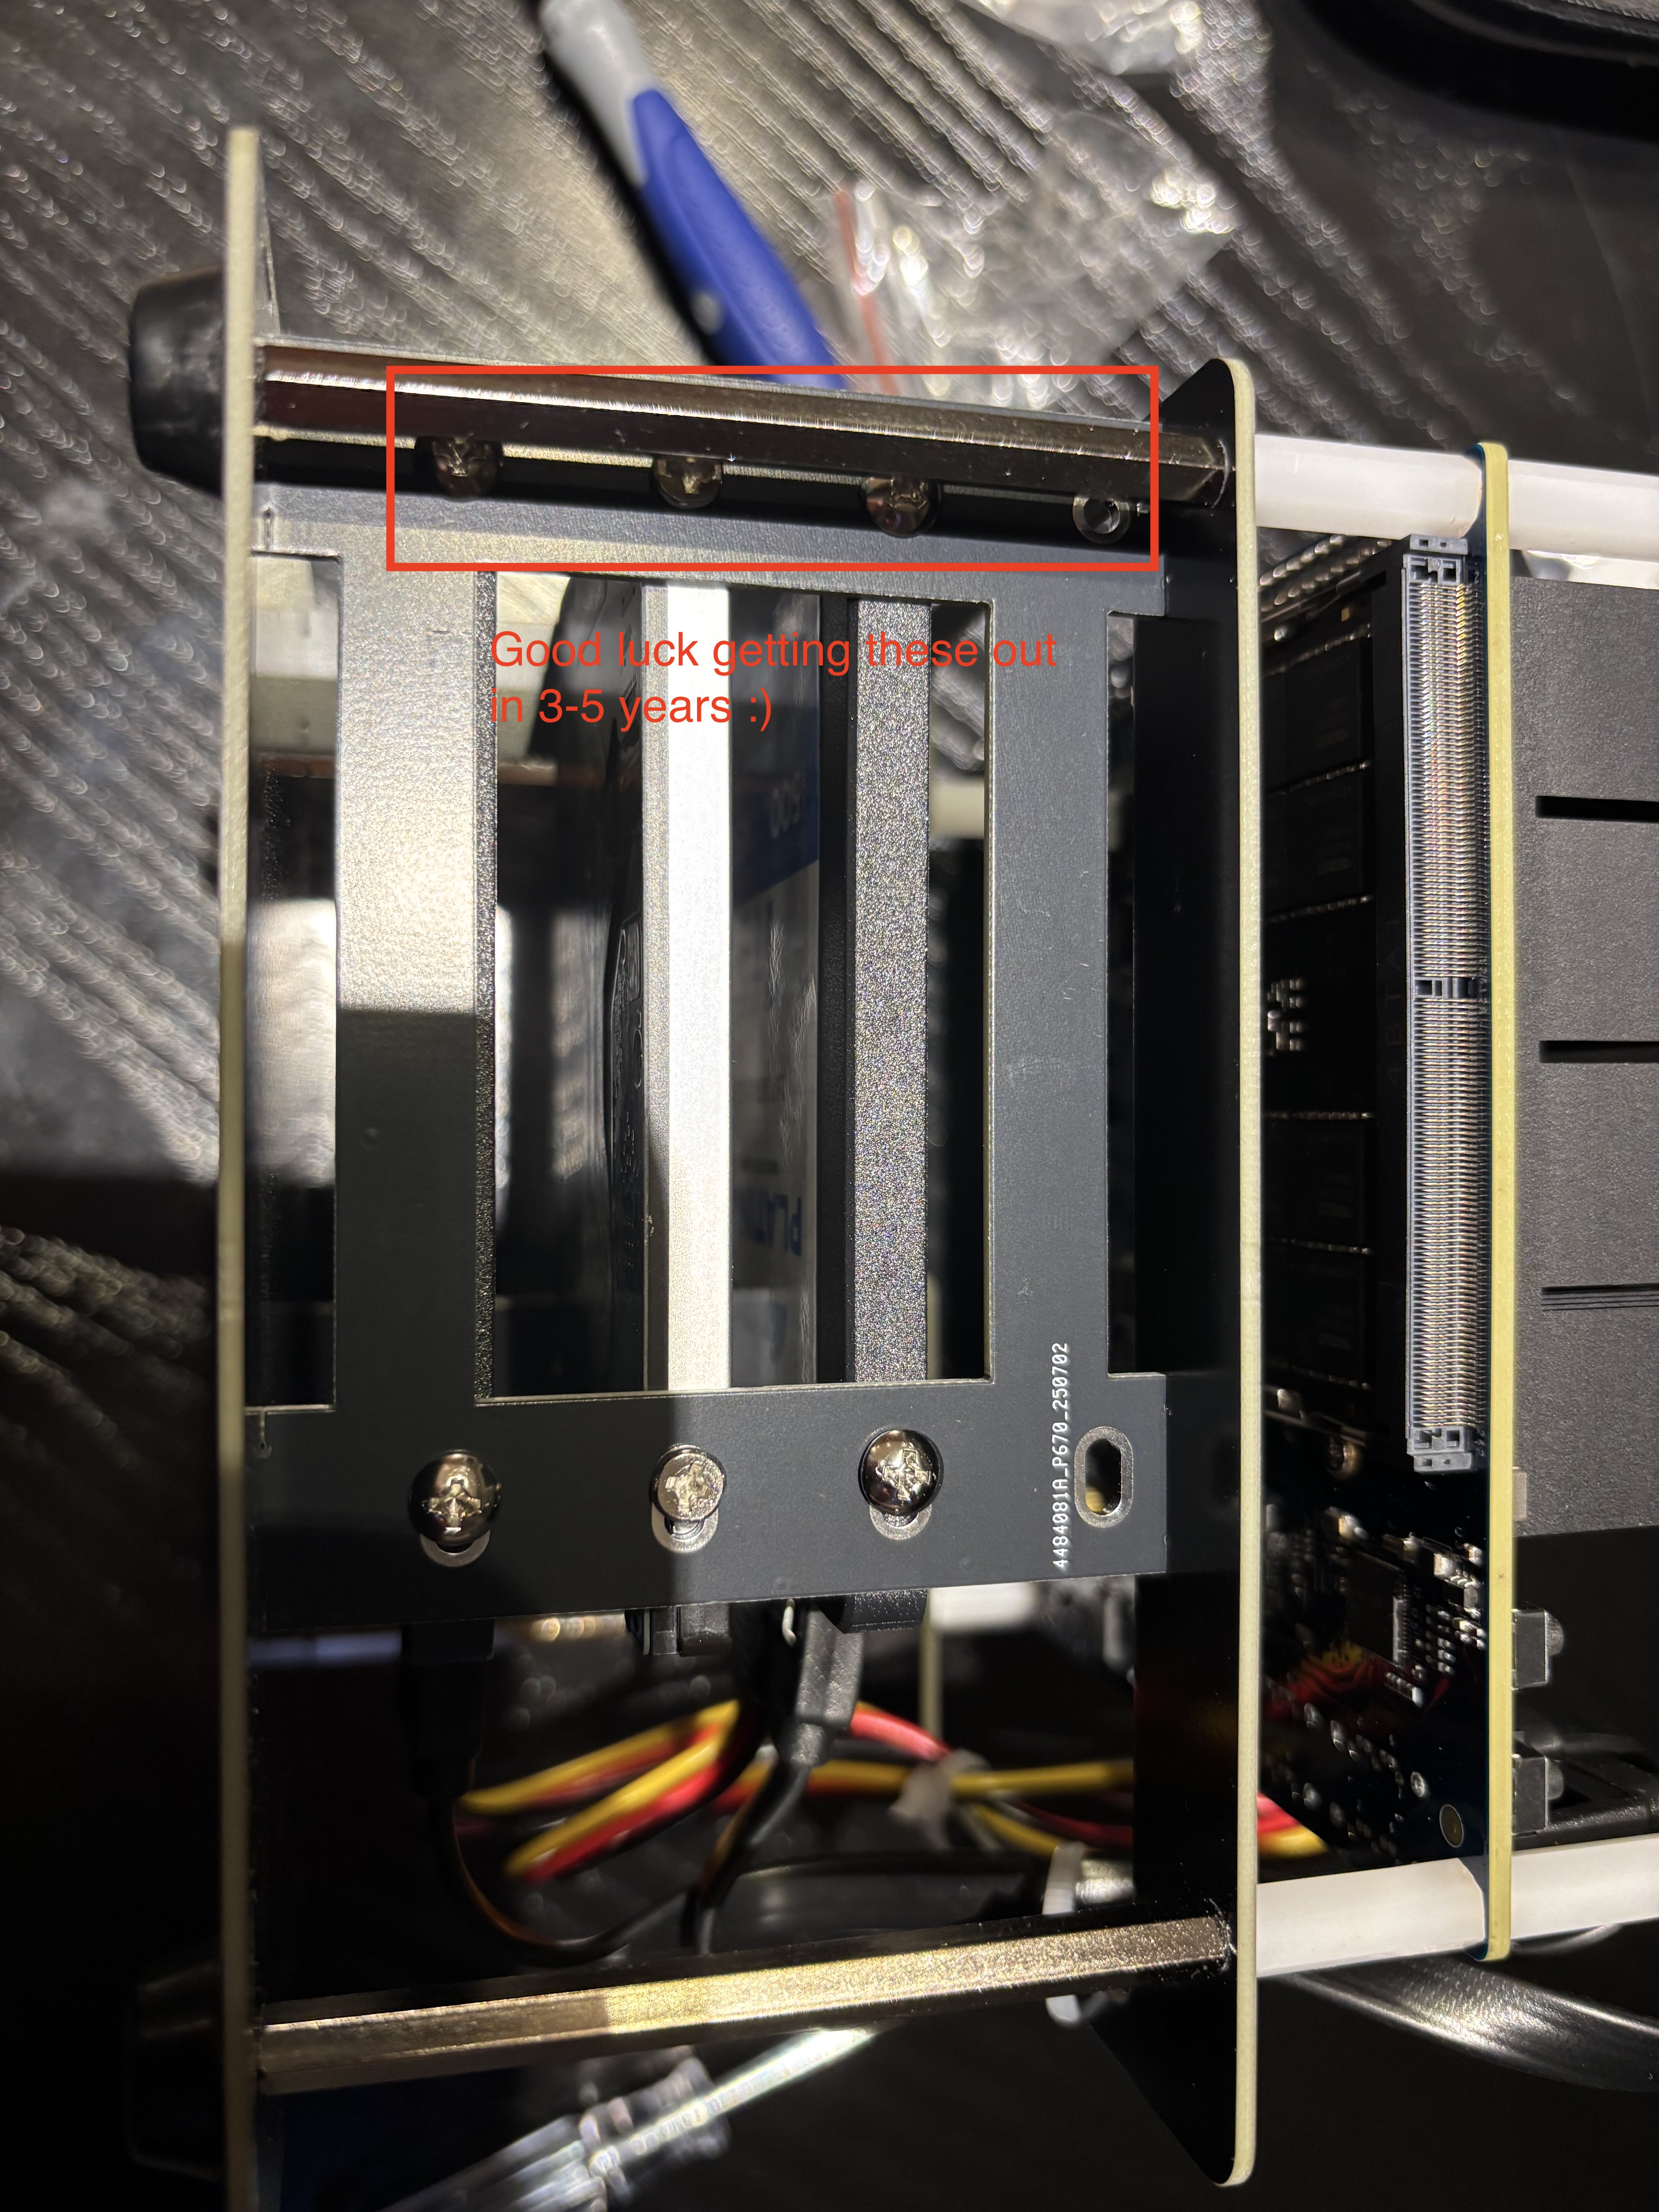
What I believe this will mean is that in the future, when I want to swap out drives. Either to upgrade storage or to fix a broken drive, I will need to take the case apart to get to them. I hope that I can take off the bottom plate, and then pull out the post that’s blocking the screws as that would be much less work than getting at it from the top and having to remove the actual hardware board.
If you’re using this case, you might want to due future self a favor and not add that last screw on each drive.